

If you’re building web apps with React, it’s hard to omit using Next.js. Love it or hate it, but Next.js is still a widely-used framework for production-ready React applications, which simplifies routing, server-side rendering, data fetching conventions and build tooling.
If you need scheduling functionality for your React and Next.js app and are looking for an event calendar library, stay with us. We’ll show you how to use SVAR React Calendar – an open-source, ready-to-use calendar library – with your stack.
Why SVAR React Calendar
SVAR React Calendar is a pre-built React component that lets you add booking calendars, schedulers, planners, and other calendar UIs to your app. It offers:
- Completely customizable with a neat API and CSS styling
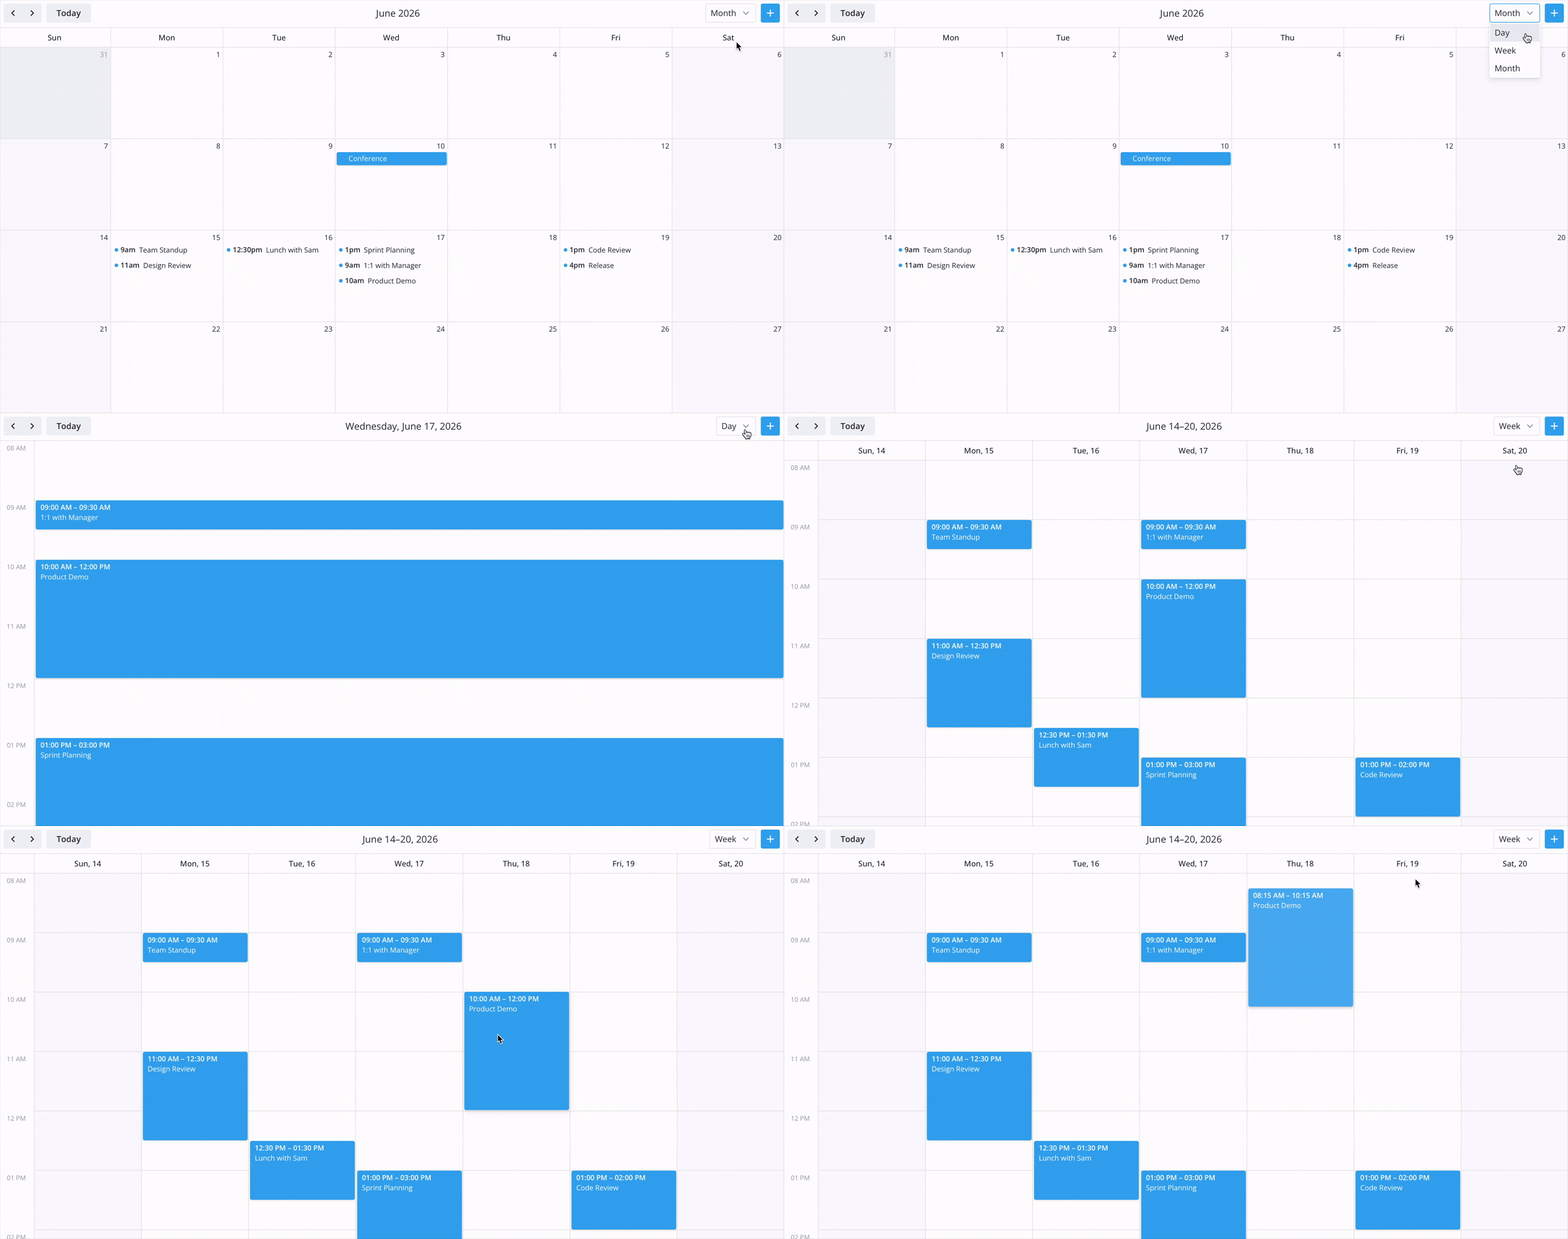
- Pre-made Day, Week, Month views
- Drag-and-drop event management
- Built-in sidebar editor
- Calendar grouping
- Free core with the ability to add PRO features (Agenda, Timeline, Resource views, recurring events, and more)
What We’ll Build
This tutorial walks you through adding the MIT-licensed version of SVAR React Calendar to a Next.js app, piece by piece. By the end, you’ll have an event calendar with Day, Week, Month views, draggable events, a sidebar editor, a toolbar, and server-side backend.
Time estimate: 30–40 minutes
Difficulty: Beginner to intermediate
Prerequisites: Basic Next.js and React knowledge
Demo code: SVAR Calendar with Next.js demo on GitHub
By following the steps below, you’ll get a fully functional scheduler for your React and Next.js app.
Setting Up a Next.js App & Adding the Calendar
We start by creating a new Next.js application:
npx create-next-app@latest my-calendar-app --typescript --tailwind --app --src-dircd my-calendar-appThen install the SVAR React Calendar package from npm:
npm install @svar-ui/react-calendarThe calendar needs browser APIs, so it has to be a client component. Create src/app/components/EventCalendar.tsx with basic configuration:
"use client";
import { Calendar } from "@svar-ui/react-calendar";
const events = [  {    id: 1,    text: "Team Standup",    start: new Date(2026, 5, 15, 9, 0),    end: new Date(2026, 5, 15, 9, 30),  },  {    id: 2,    text: "Design Review",    start: new Date(2026, 5, 15, 11, 0),    end: new Date(2026, 5, 15, 12, 30),  },  // ... more events];
export default function EventCalendar() {  return (    <div style={{ height: "600px", width: "100%" }}>      <Calendar events={events} view="week" date={new Date(2026, 5, 17)} />    </div>  );}
Each event needs an id, a start Date, and an end Date. Everything else (like the text, colors, an allDay flag) is optional.
view prop picks the active view (day, week, or month), and date tells the calendar component which range to show.
Wire it up in src/app/page.tsx file:
import EventCalendar from "./components/EventCalendar";
export default function Home() {  return (    <div className="h-screen flex flex-col">      <header className="p-6">        <h1 className="text-3xl font-bold">My Calendar</h1>      </header>      <main className="flex-1 min-h-0">        <EventCalendar />      </main>    </div>  );}
Run npm run dev and you’ll see that the component renders, but something’s off. Calendar elements might be misaligned, with no proper styling. So, let’s move to the next step and apply the styles.
Adding Styles
To add prebuilt styles to the calendar component, update the imports in EventCalendar.tsx with the following:
"use client";
import { Calendar } from "@svar-ui/react-calendar";import "@svar-ui/react-calendar/all.css";
The SVAR React Calendar package ships two CSS files: all.css and style.css:
all.cssincludes styles for all SVAR components used inside the Calendar: DataGrid, Toolbar, Editor, Menu, etc.style.csscovers only the Calendar itself, which can help with bundle size if you’re already loading the other components separately.
In our case, we’re using all.css.
Also, you need to apply theme by wrapping the UI into a theme provider. For this tutorial, we’re using the light Willow theme:
"use client";
import { Calendar, Willow } from "@svar-ui/react-calendar";import "@svar-ui/react-calendar/all.css";
// ... events definition ...
export default function EventCalendar() {  return (    <div style={{ height: "600px", width: "100%" }}>      <Willow>        <Calendar events={events} view="week" date={new Date(2026, 5, 17)} />      </Willow>    </div>  );}
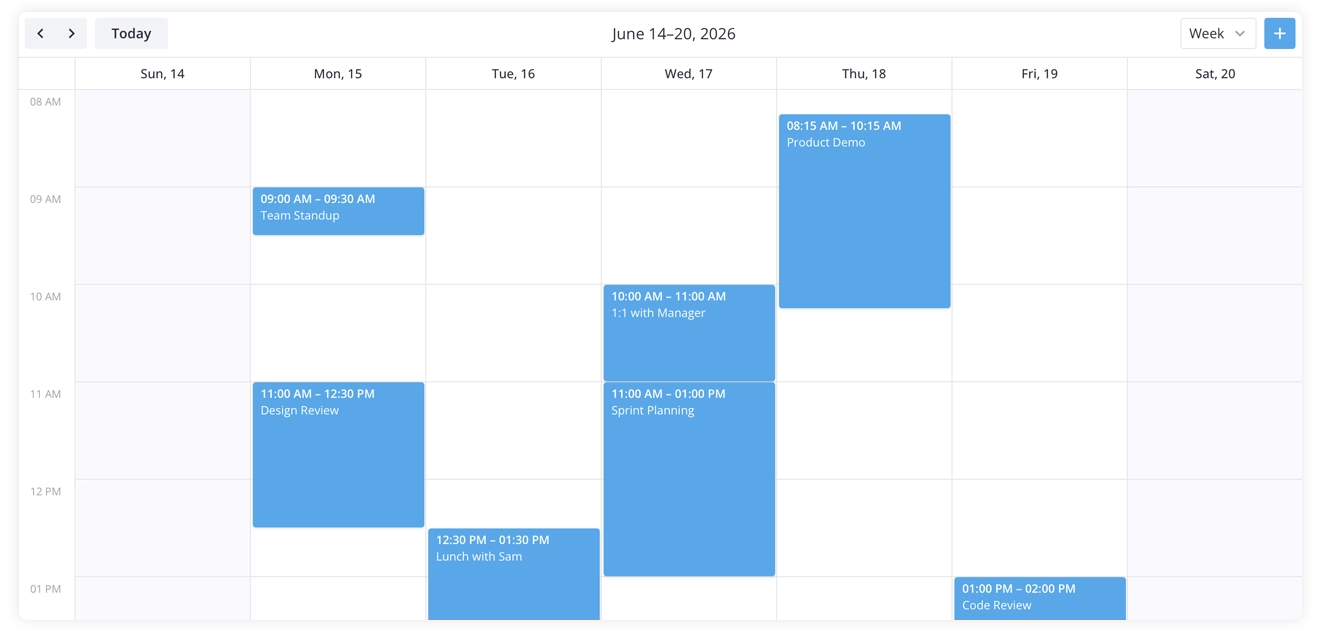
Now we’ve got styled headers, colored event blocks, and proper visual feedback.
Fixing the Layout
The fixed 600px height works, but if you want the Calendar to fill the available space, switch to percentage height:
<div style={{ height: "100%", width: "100%" }}> <Willow> <Calendar events={events} view="week" date={new Date(2026, 5, 17)} /> </Willow></div>Note: the theme wrapper needs explicit height too so the calendar won’t collapse. Add this to globals.css:
html,body {  height: 100%;  margin: 0;}
.wx-theme {  height: 100%;}
.wx-theme is the internal class of SVAR’s theme providers. Without explicit height, it defaults to content-based sizing, which breaks the percentage-based layout chain.
The Calendar should now fill its container properly.
How to Handle the Hydration Warning
With everything working, you might see this in the browser console:
A tree hydrated but some attributes of the server rendered HTMLdidn't match the client properties.This is a warning, not an error, so keep calm and carry on :) The Calendar has to measure the DOM to size itself, and during SSR there’s no DOM to measure — so the server render can never match what the client produces. The client values win anyway; the warning is just flagging a server render you were going to discard.
The cleanest fix is not to render the Calendar on the server at all. Mount it on the client only:
"use client";
import { useState, useEffect } from "react";import { Calendar, Willow } from "@svar-ui/react-calendar";import "@svar-ui/react-calendar/all.css";
// ... events definition ...
export default function EventCalendar() {  const [mounted, setMounted] = useState(false);
  useEffect(() => {    setMounted(true);  }, []);
  if (!mounted) {    return <div style={{ height: "100%", width: "100%" }} />;  }
  return (    <div style={{ height: "100%", width: "100%" }}>      <Willow>        <Calendar events={events} view="week" date={new Date(2026, 5, 17)} />      </Willow>    </div>  );}
This renders an empty placeholder during SSR. Once the client mounts, the Calendar appears with no mismatch or warning. There’s nothing server-rendered to compare against, so you’re no longer paying for a server render you were going to discard.
You can instead leave the code as-is and ignore the warning since the component will work anyway. But a real console warning is easy to lose among the ones you actually need to act on, so silencing it is worth the few lines. The rest of this guide uses the client-only version above.
Adding the Editor
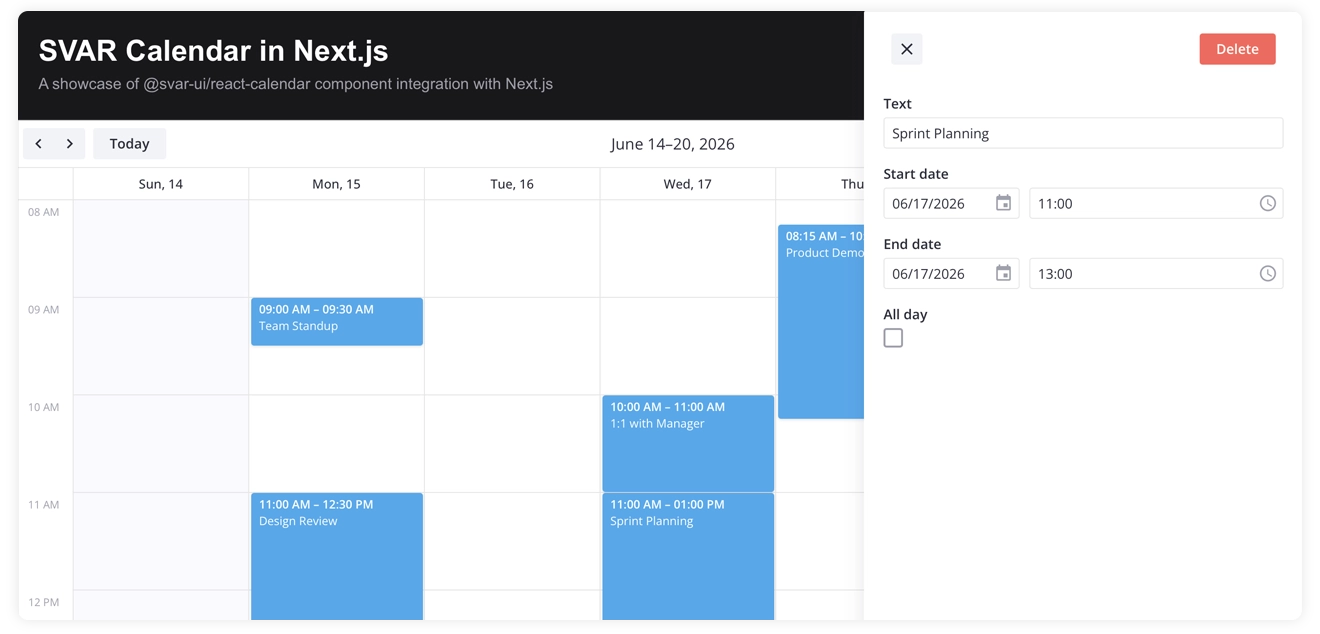
So far the Calendar displays events but doesn’t let users edit them, apart from drag-and-drop on the calendar scale. We’ll add a sidebar editor that will allow users to edit the event details: description, start/end date, or set an event as a full-day.
The Calendar exposes its API through an init callback. Capture the reference and pass it to an Editor component – add SVAR React Editor to the app:
"use client";
import { useState, useEffect } from "react";import { Calendar, Willow, Editor } from "@svar-ui/react-calendar";import "@svar-ui/react-calendar/all.css";
// ... events definition ...
export default function EventCalendar() {  const [mounted, setMounted] = useState(false);  const [api, setApi] = useState(null);
  useEffect(() => {    setMounted(true);  }, []);
  if (!mounted) {    return <div style={{ height: "100%", width: "100%" }} />;  }
  return (    <div style={{ height: "100%", width: "100%" }}>      <Willow>        <Calendar          events={events}          view="week"          date={new Date(2026, 5, 17)}          init={setApi}        />        {api && <Editor api={api} />}      </Willow>    </div>  );}
Here’s a quick breakdown on the code:
init={setApi}- when the Calendar initializes, it passes its API object to our state setter{api && <Editor ... />}- the Editor needs the API to work, so we render it only once the API is availableEditor- renders a side panel when an event is selected
Click an event and the editor panel opens on the right, allowing users to manage event details.
Adding a Backend
We’ve now got an event calendar rendering with client-side data and editing. However, if you make some changes, rearrange the events, and then try to refresh the page, all your changes will be gone. So let’s add a backend to keep the changes in the calendar.
Note: The complete backend code is in the demo repo.
Setting Up the Database
For our demo, we’ll use SQLite library, which is file-based, with no separate server, and good enough for demos and small teams. Here is how to install it:
npm install better-sqlite3npm install -D @types/better-sqlite3The database module lives at src/lib/db.ts. It’s one table:
CREATE TABLE events ( id INTEGER PRIMARY KEY AUTOINCREMENT, text TEXT DEFAULT '', start TEXT, "end" TEXT, allDay INTEGER DEFAULT 0);A few notes on the schema:
startandendare stored as TEXT (ISO date strings).endis quoted since it’s a SQL keyword, the column name needs double quotes.allDayis stored as an integer (0/1) and converted back to a boolean when we read it.- Any extra fields you put on an event (a color, a
calendarId) are passed through untouched in the request payload, but the backend still has to store them. Add the column to the schema and extend the INSERT/UPDATE statements indb.tsto read and write it. - The demo’s
createEvent/updateEventonly persisttext,start,end, andallDay; any field they don’t list is silently dropped.
The database initializes on the first access. If the table is empty, it seeds sample data so there’s something to display.
Loading Data
Now that the database is in place, let’s connect the Calendar to it. The component runs in the browser and can’t reach the database directly, so we’ll put a small REST API in between. We’ll start with loading events, and then move on to saving changes.
Server Side
Expose events through REST endpoints. Here’s the events route at src/app/api/events/route.ts:
import { NextResponse } from "next/server";import { getAllEvents } from "@/lib/db";
export async function GET() {  return NextResponse.json(getAllEvents());}
Dates are stored as ISO strings in the database. We’ll handle conversion on the client — and, as you’ll see in a moment, RestDataProvider does it for us automatically.
Client Side
To connect SVAR React Calendar to the backend, you need the RestDataProvider, a helper that simplifies backend integration and CRUD operations through REST API. Unlike other SVAR components, the Calendar ships its provider in the main package so you don’t need to add extra dependency:
import { RestDataProvider } from "@svar-ui/react-calendar";The component changes are minimal. Instead of a hardcoded array, you just need to initialize a RestDataProvider and call getData():
const server = useMemo(() => new RestDataProvider("/api"), []);
useEffect(() => {  server.getData().then((data) => {    setEvents(data);  });}, [server]);
RestDataProvider is a thin wrapper around fetch that does two things:
- Fetches
/api/events - Converts the
startandendstrings from JSON into JavaScriptDateobjects
With the help of RestDataProvider, the calendar component receives ready-to-use data, and that’s how the loading data is performed.
Loading is easy to swap out if you need to — at the end of the day, it’s just a fetch. Saving is where the provider earns its keep: it maps every Calendar action (create, edit, drag, delete) to the right HTTP call, handles server-assigned IDs, and queues concurrent edits. Reimplementing all of that by hand is a lot of work, so for most apps the sensible split is: customize loading if you want, but let RestDataProvider handle the writes. We’ll see how in the next section.
Saving Data
Of course, loading events is only half the job. Your users will add, edit, and delete events, and those changes need to get back to the database. For that, the provider expects a small set of REST endpoints:
| Method | Endpoint | Purpose |
|---|---|---|
| GET | /events | Get all events |
| POST | /events | Create event |
| PUT | /events/{id} | Update event |
| DELETE | /events/{id} | Delete event |
POST and PUT responses should return the ID of the created or updated event: { "id": 123 }. New events don’t have an ID until the server assigns one, so the provider needs it back to keep the calendar in sync. DELETE, on the other hand, has nothing to return — an empty object {} is all it takes.
The routes themselves follow a simple pattern: collection routes live together, item routes live separately. GET and POST (no id in the URL) stay in src/app/api/events/route.ts, while PUT and DELETE, which operate on a specific event, go in src/app/api/events/[id]/route.ts with the id coming from the route params.
See the Saving to server documentation for detailed request/response formats.
Connecting the Calendar Component
With endpoints ready, we can now connect the data provider to the Calendar through its init callback. Replace the init prop from the previous step with this one:
const init = useCallback((api) => { setApi(api); api.setNext(server);}, [server]);setNext plugs the provider into the component’s action pipeline. When an event is created, edited, dragged to a new time, or deleted, the action flows through the provider to the correct REST endpoint. This is a one-directional, outbound channel that pushes local changes to the server and does not pull from it or keep the two in sync.
How does this work? The Calendar emits actions for every data operation: add-event, update-event, delete-event. RestDataProvider intercepts these, maps them to HTTP methods, sends only the relevant data, and handles the response (including updating local IDs after creation).
No event handlers to wire up, no optimistic updates to manage. The provider handles the mapping between component actions and REST calls. If the default REST scheme doesn’t fit your backend, you can customize routes, add headers, or define your own transport - but that’s beyond our tutorial.
Drag, Resize, and Reschedule
Users can drag an event to a different slot or stretch its edges to change the duration. There’s nothing extra to implement on the server for this.
An event’s position is defined by its start and end. So when a user drags or resizes an event, SVAR React Calendar commits the change as an ordinary update-event, which the provider sends as PUT /events/{id} with the new dates. The same endpoint that handles edits from the editor handles drag-and-drop, so that’s one less thing to build.
The Toolbar
Good news: you don’t need to build any UI for adding and editing events. The Calendar ships with its own toolbar that holds an “Add event” button, date navigation arrows, a “Today” button, and the day/week/month view switcher.

The neat part is that every button works through the same pipeline: click “Add event” and the Calendar dispatches the same
action it would if you created the event in the editor, and the action flows through the data provider to the REST endpoint. Switch weeks and the grid and editor stay in sync — no extra wiring, everything routes through the setNext() call from the init callback.
Handling Errors
No backend is perfect: requests fail, and servers reject saves. Let’s handle errors on both sides (loading events and saving changes) and then look at a centralized way to catch everything in one place.
Loading Errors
getData() returns a promise, so handling fetch failures is direct:
server.getData() .then((data) => { setEvents(data); }) .catch((error) => { // Show error UI, retry option, etc. console.error("Failed to load data:", error); });Save Operation Errors
When a save fails, the action bubbles through the component’s event system with error information. You can listen for specific actions and react - for instance, remove an event that failed to save.
A server can reject a save to protect its data, but SVAR Calendar treats that as the exception rather than the rule: its client-side API lets you validate input before it’s sent, so most problems are caught and reported without a server round-trip.
There’s no built-in handler for the errors that are returned by the server, so it’s up to you. Two practical options: dispatch actions to revert the failed operation, or reload the calendar with fresh data from the server. Either way the UI ends up back in sync with the actual database state.
Custom Error Handling with RestDataProvider
For centralized error handling, subclass RestDataProvider and override send:
class MyDataProvider extends RestDataProvider { async send( url: string, method: string, data?: object, customHeaders: Record<string, string> = {} ) { try { return await super.send(url, method, data, customHeaders); } catch (error) { // Show toast notification, log to monitoring service, etc. showErrorNotification("Failed to save changes"); throw error; } }}This intercepts all REST operations in one place, which is the simplest way to catch failures and surface them in your UI.
Complete Component Code
Here’s the full EventCalendar.tsx with all pieces in place:
"use client";
import { useState, useEffect, useCallback, useMemo } from "react";import { Calendar, Willow, Editor, RestDataProvider } from "@svar-ui/react-calendar";import type { CalendarEvent, CalendarInstanceApi } from "@svar-ui/react-calendar";import "@svar-ui/react-calendar/all.css";
const apiUrl = "/api";
export default function EventCalendar() {  const [mounted, setMounted] = useState(false);  const [events, setEvents] = useState<CalendarEvent[]>([]);  const [api, setApi] = useState<CalendarInstanceApi | null>(null);
  const server = useMemo(() => new RestDataProvider(apiUrl), []);
  useEffect(() => {    setMounted(true);    server.getData().then((data) => {      setEvents(data);    });  }, [server]);
  const init = useCallback(    (calendarApi: CalendarInstanceApi) => {      setApi(calendarApi);      calendarApi.setNext(server);    },    [server]  );
  if (!mounted) {    return <div style={{ height: "100%", width: "100%" }} />;  }
  return (    <div style={{ height: "100%", width: "100%" }}>      <Willow>        <Calendar          events={events}          view="week"          date={new Date(2026, 5, 17)}          init={init}        />        {api && <Editor api={api} />}      </Willow>    </div>  );}
One Next.js detail: better-sqlite3 is a native module, so it can’t be bundled. Tell Next.js to leave it external in next.config.ts:
const nextConfig: NextConfig = { serverExternalPackages: ["better-sqlite3"],};Summary
We now have a working event calendar integrated with React and Next.js that syncs all changes to the server:
- Loading:
RestDataProvider.getData()fetches and parses events - Saving: Actions flow through
api.setNext(server)to REST endpoints - Drag and resize: Rescheduling is just an
update-event- no special handling - User-friendly UI: The toolbar provides common operations, the Editor allows event editing
Next Steps
If you want to go further and learn how you can configure the Calendar and what other feature it offers out-of-the box, here are the useful links:
- Documentation & API references
- Demos with source code
- GitHub repo - leave it a star if you like the project ⭐
And if you’re looking for more advanced scheduling features, like Timeline, Agenda or Resource views, recurring events, etc, see what PRO Edition is offering. Free trial is available.
Happy coding & stay on schedule!